
I had been using a 36in. lg 5mm dia launch rod for all my launches, but it was only when I started to video the launches did I notice I was having severe "Rod Whip" which was effecting the flights.
The answer to this problem was either move up to a larger diameter rod or move to a rail system.
I decided on a rail system. A rail system is a solid piece of material (Usually Aluminium) with some sort of grooved channel running down it which you fit your rail buttoned Rocket onto.
So looking around the rocketry suppliers I was able to find several rails, but they were all expensive (well out of the reach of my pocket), so Mark and myself started to search the Internet for suitable sources of supply. I eventually found a company in Ripley (Derbyshire) called Machine Building Systems that looked to have some suitable products. I spoke to them and requested some samples that got delivered the next day, then during our Shed Renovation Programme, Mark, Dave and myself went over the samples and tried out some buttons to see which rail was the best. In the end we decided on the 30x30 light profile 6.
Now on to the rail!!
The 30x30 light Profile 6 is make up from anodized aluminium, and can be supplied in various lengths from the supplier.
The club recommends getting 1m lengths and then joining them together to make longer rails, this is so it fits in your car better and you can adjust your rail length to suit the rocket.
There are 2 possible ways of making your rail up, either a folding rail or a non-folding rail.
A non-folding rail is just 2 rails connected together with brackets.
A folding rail is 2 rails connected together with a hinge, and the use of a bracket to firmly fixed the rail when it's unfolded into it's extended position.
I prefer the folding type, and that's what I ordered for myself.
Rail Systems:
To make a "folding" 2m rail, you will need to get the following bits
2 x 1m 30x30 light Profiles 6 Rail Pt.No. 0.0.419.06
1 x Bracket Pt.No. 0.0.459.11
2 x Bracket Fastening Sets Pt.No. 0.0.459.26
2 x T-Slot Nuts (M5) Pt.No. 0.0.419.43
1 x Hinge Pt.No. 0.0.441.58
Approx Cost will be (including Packing, Delivery and VAT) £29.57
To make a "non-folding" 2m rail, you will need to get the following bits
2 x 1m 30x30 light Profiles 6 Rail Pt.No. 0.0.419.06
1 x Bracket Pt.No. 0.0.459.11
2 x Bracket Fastening Sets Pt.No. 0.0.459.26
Approx Cost will be (including Packing, Delivery and VAT) £27.38
To make a "folding" 3m rail, you will need to get the following bits
3 x 1m 30x30 light Profiles 6 Rail Pt.No. 0.0.419.06
2 x Bracket Pt.No. 0.0.459.11
4 x Bracket Fastening Sets Pt.No. 0.0.459.26
4 x T-Slot Nuts (M5) Pt.No. 0.0.419.43
2 x Hinge Pt.No. 0.0.441.58
Approx Cost will be (including Packing, Delivery and VAT) £47.94
To make a "non-folding" 3m rail, you will need to get the following bits
2 x 1m 30x30 light Profiles 6 Rail Pt.No. 0.0.419.06
2 x Bracket Pt.No. 0.0.459.11
4 x Bracket Fastening Sets Pt.No. 0.0.459.26
Approx Cost will be (including Packing, Delivery and VAT) £43.55
As a precaution, the club recommends you buy an additional.
1 x Bracket Pt.No. 0.0.459.11
2 x Bracket Fastening Sets Pt.No. 0.0.459.26
Approx Cost will be (excluding Packing, Delivery and VAT) £3.42
Why?, well you never no when you might lose something!!
If you think these prices are expensive, then visit Giant Leap Rocketry and see what they are charging for a rail system of equal spec "The Heavy Extreme Rail".
Rail Buttons:
To launch your rockets, you no longer require the usual launch lugs, but you use Rail Buttons. These are round plastic devices that you connect to your rocket and they slide in the aluminium rail.
I use the 1000 series buttons from www.railbuttons.com, but Pete also sells rail buttons as well. Both of these buttons have been tried in the rail and they fit perfectly.
My Rail Setup:
As I said before, I went for a folded rail solution, and here are some pictures of my newly constructed rail system.
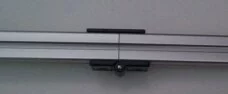
This is the rail in it's extended position with the locking bracket (top) and hinge (bottom) in place.
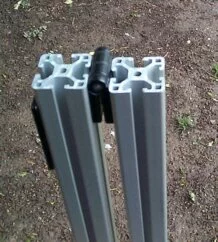
This is the rail in it's folded "carrying position"
Here is the rail fitted to my pad along with my "Fatboy Raptor"


